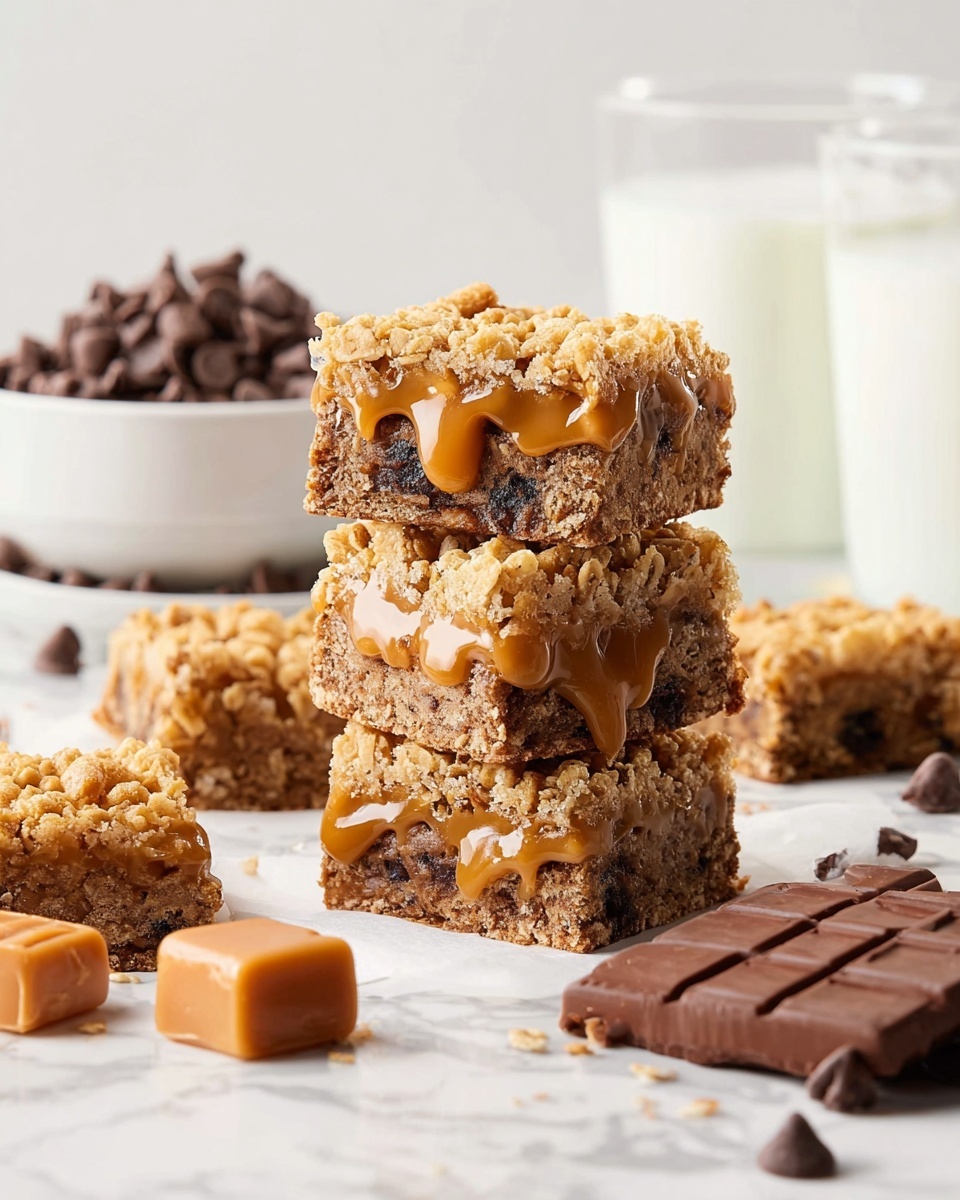
Chocolate Caramel Carmelitas Recipe
Oh, you’re going to love this Chocolate Caramel Carmelitas Recipe — it’s one of those treats that feels both indulgent and just downright comforting. The chewy oat cookie base paired with gooey caramel and melty chocolate chips makes it a crowd-pleaser at every gathering I bring it to. Seriously, it’s like a homemade candy bar in square form, and the best part is how easy it comes together.
I often whip up a batch when I’m craving a snack that’s a little more special than your everyday cookie. Plus, they hold up wonderfully, so it’s perfect for making ahead when you want to have a sweet fix ready to go. If you’ve never tried a Carmelita before, this Chocolate Caramel Carmelitas Recipe will quickly become a staple in your treat rotation — just wait until that caramel oozes with every bite!
Ingredients You’ll Need
This recipe balances the nutty chew of oats and the buttery cookie base with luscious caramel and creamy chocolate. Each ingredient plays a key role, and I always recommend using quality chocolate and real caramel for the best results.
- All purpose flour: The backbone of the cookie base — don’t substitute without adjusting liquids.
- Old fashioned oats: Adds that satisfying chew and rustic texture I love.
- Salted butter melted: Makes the base rich and tender, melting works best for even mixing.
- Light brown sugar: Gives a touch of molasses flavor, which complements the caramel perfectly.
- Pure vanilla extract: A flavor booster — I always use real vanilla for depth.
- Baking soda: Helps the base rise slightly and keep the texture light.
- Kosher salt: Balance the sweet, enhances all the flavors.
- Milk chocolate chips: Melts into creamy pockets of chocolate — I pick good quality chips that melt evenly.
- Individually wrapped caramels: These make the caramel layer perfectly gooey and manageable.
- Heavy cream: Turns the caramels into a luscious caramel sauce that spreads easily.
Variations
I like to switch this Chocolate Caramel Carmelitas Recipe up depending on who I’m serving it to and what I have on hand. Feel free to make this treat truly yours by trying out some easy tweaks!
- Dark chocolate instead of milk chocolate: Gives a richer, slightly less sweet bite. I tried this once for a more sophisticated palate and loved the depth it added.
- Sea salt sprinkle on top: A quick sprinkle just before baking brings out the caramel’s flavor beautifully — trust me, it’s heavenly.
- Use coconut caramel for dairy-free: When friends come over who avoid dairy, I swap in coconut-based caramels and it turns out just as delicious.
- Add nuts like pecans or walnuts: For extra crunch and buttery richness that pairs perfectly with the smooth caramel layer.
How to Make Chocolate Caramel Carmelitas Recipe
Step 1: Mix Your Cookie Base
Start by combining the all-purpose flour, old fashioned oats, baking soda, and kosher salt in a large bowl — give it a good whisk so everything’s evenly distributed. Next, stir in your melted salted butter, brown sugar, and vanilla extract until you get a crumbly but sticky mixture. The trick here is not to overmix — you want the texture chunky and coarse because that’s what gives Carmelitas their character.
Step 2: Press Half the Base into Your Pan
Grab a parchment-lined 9×13 inch baking pan and press half of your cookie mixture evenly into the bottom. It’s important to press firmly here — I use the bottom of a measuring cup to get an even layer that bakes into a sturdy base for those luscious caramel and chocolate layers.
Step 3: Prepare and Pour the Caramel Chocolate Layer
Gently melt the individually wrapped caramels with the heavy cream in a small saucepan over low heat, stirring constantly until smooth. Once melted, spread this warm caramel evenly over the cookie base. Immediately sprinkle the milk chocolate chips over the caramel while it’s still gooey so they melt slightly and create that dreamy blend of chocolate and caramel that defines this Chocolate Caramel Carmelitas Recipe.
Step 4: Add the Remaining Cookie Mixture
Sprinkle the remaining cookie mixture over the chocolate chips, gently pressing it down just a bit. You don’t want to squish the chocolate or caramel but you do want everything to stick together. This triple-layer magic is what makes Carmelitas so addictive!
Step 5: Bake and Cool
Bake your Carmelitas at 350°F (175°C) for about 25-30 minutes or until the top is golden and set. Remember, the caramel will stay soft, so don’t worry if it looks a little gooey at first. Once out of the oven, cool completely in the pan before cutting into bars — this step is crucial or else your Carmelitas will fall apart.
How to Serve Chocolate Caramel Carmelitas Recipe

Garnishes
When I serve these, I love adding a light dusting of powdered sugar or a sprinkle of flaky sea salt on top. It adds a little visual pop and that subtle salty-sweet note that just elevates the whole bar. Plus, a few extra chocolate chips on top fresh from the melting stage are always welcome for guests who adore chocolate.
Side Dishes
Pair your Carmelitas with a hot cup of coffee or rich dark roast tea — the bitterness cuts beautifully through the sweet, gooey richness. I’ve also enjoyed them alongside vanilla ice cream for dessert nights, which makes it feel like a decadent sundae bar. Honestly, these bars hold their own as a sweet snack or dessert any time!
Creative Ways to Present
For parties, I like cutting the Carmelitas into small bite-sized squares and arranging them on a nice platter with colorful festive liners — they instantly become the star of the dessert table. Another fun idea I tried was drizzling extra melted chocolate on top for a decorative touch and adding edible gold flakes for a fancy twist. It’s those little details that make saying “here, try this!” extra special.
Make Ahead and Storage
Storing Leftovers
I store leftover Carmelitas in an airtight container at room temperature if I’m eating them within a couple of days. They stay tender and chewy that way without drying out. If my kitchen is warm, I pop them in the fridge but bring them out a bit before serving — they soften up quickly.
Freezing
Freezing Carmelitas works like a charm! I wrap individual bars tightly in plastic wrap and then place them in a freezer-safe bag. When you’re ready to enjoy, just thaw overnight in the fridge or at room temperature, and they taste as fresh as the day you made them. It’s perfect for holiday prep or batch baking.
Reheating
If you prefer your Carmelitas warm, pop an individual bar in the microwave for 10-15 seconds. That melts the chocolate and softens the caramel just right without making the base soggy. I’ve found this quick reheat step turns every bite into a melty, dreamy experience!
FAQs
-
Can I use a different type of chocolate in this Chocolate Caramel Carmelitas Recipe?
Absolutely! You can swap milk chocolate chips for semi-sweet, dark, or even white chocolate depending on your preference. Just keep in mind that darker chocolates will reduce the overall sweetness, which many people enjoy in this sweet-and-salty treat.
-
What’s the best way to melt the caramels for the filling?
The trick is low heat and patience. Melt the caramels with heavy cream in a small saucepan over low heat, stirring constantly so they don’t burn or seize. This creates a smooth, pourable caramel sauce that spreads easily over your cookie base.
-
Can I make this recipe gluten-free?
Yes, by substituting the all-purpose flour with a gluten-free blend designed for baking, you can make these Carmelitas safe for gluten-sensitive eaters. Just check that your oats are certified gluten-free as well to avoid cross-contamination.
-
How long will these Carmelitas stay fresh?
Stored in an airtight container, these bars stay fresh for up to 4-5 days at room temperature. For longer storage, refrigerate or freeze them, and bring to room temp before serving to restore that perfect chewy texture.
-
Can I prepare this recipe ahead of time for a party?
Definitely! Chocolate Caramel Carmelitas Recipe is perfect for make-ahead treats. Bake them a day or two in advance and store airtight — they actually taste better after the flavors have melded. Just remember to cut them after they cool completely.
Final Thoughts
This Chocolate Caramel Carmelitas Recipe holds a special spot in my kitchen and heart because it perfectly balances that nostalgic, chewy oat bar with the pure joy of sticky, melted caramel and smooth chocolate. I recommend you give it a shot — whether for weekday treats, weekend bakers’ projects, or special gatherings, it never fails to impress. Once you try making Carmelitas at home, it’ll likely become one of those treasured “go-to” recipes you pull out whenever a craving strikes or company comes knocking.
Print
Chocolate Caramel Carmelitas Recipe
- Prep Time: 15 minutes
- Cook Time: 30 minutes
- Total Time: 45 minutes
- Yield: 16–20 bars 1x
- Category: Dessert
- Method: Baking
- Cuisine: American
Description
Carmelitas are a delightful bar cookie featuring a chewy oat and brown sugar base layered with gooey caramel and rich milk chocolate chips. This recipe combines the perfect balance of buttery, sweet, and melty textures for an irresistible treat perfect for any dessert occasion or snack time.
Ingredients
Cookie Base
- 1½ cups all purpose flour
- 1½ cups old fashioned oats
- 1 cup salted butter, melted
- ¾ cup light brown sugar, tightly packed
- 2 teaspoons pure vanilla extract
- 1 teaspoon baking soda
- ½ teaspoon kosher salt
Chocolate and Caramel Layer
- 1½ cups milk chocolate chips
- 11 ounces individually wrapped caramels
- ½ cup heavy cream
Instructions
- Prepare the Oven and Pan: Preheat your oven to 350°F (175°C). Line a 9×13-inch baking pan with parchment paper, leaving an overhang on the sides for easy removal of the bars later.
- Make the Cookie Base: In a large mixing bowl, combine the all purpose flour, old fashioned oats, baking soda, and kosher salt. Stir in the melted salted butter, light brown sugar, and pure vanilla extract until all ingredients are thoroughly combined into a crumbly but cohesive dough.
- Form the Bottom Layer: Press about two-thirds of the cookie base mixture evenly and firmly into the prepared baking pan to create the bottom crust. Use the back of a spatula or your hands to press it down firmly to ensure it holds together after baking.
- Bake the Base: Bake the crust in the preheated oven for about 12-15 minutes until it is lightly golden and set. Remove from the oven and allow it to cool slightly while you prepare the caramel layer.
- Prepare the Caramel Chocolate Layer: Unwrap the caramels and place them in a small saucepan with the heavy cream. Heat gently over low heat, stirring frequently until the caramels have fully melted and the mixture is smooth. Remove from heat and immediately sprinkle the milk chocolate chips evenly over the baked cookie base. Pour the warm caramel mixture evenly over the chocolate chips to create the chocolate-caramel layer.
- Bake Finished Carmelitas: Return the pan to the oven and bake for an additional 15-18 minutes or until the chocolate chips are melted and the caramel layer is bubbling slightly. The edges should be golden and the bars set.
- Cool and Set: Remove the pan from the oven and place it on a wire rack to cool completely. Once fully cooled, use the parchment paper overhang to lift the bars from the pan. Slice into squares or rectangles as desired.
- Serve and Enjoy: Carmelitas are best served at room temperature or slightly chilled. Store any leftovers in an airtight container at room temperature for up to 3 days or refrigerate for longer freshness.
Notes
- If you prefer a chewier texture, reduce the baking time slightly on the initial crust bake.
- For a richer flavor, use European-style unsalted butter and adjust the salt accordingly.
- You can substitute semi-sweet chocolate chips for milk chocolate if desired.
- To speed cooling, refrigerate the cooled carmelitas for 30 minutes before slicing.
- Be sure to stir the caramel frequently while melting to avoid burning or sticking.
- Using parchment paper in the pan ensures easy removal of the bars without breaking.


