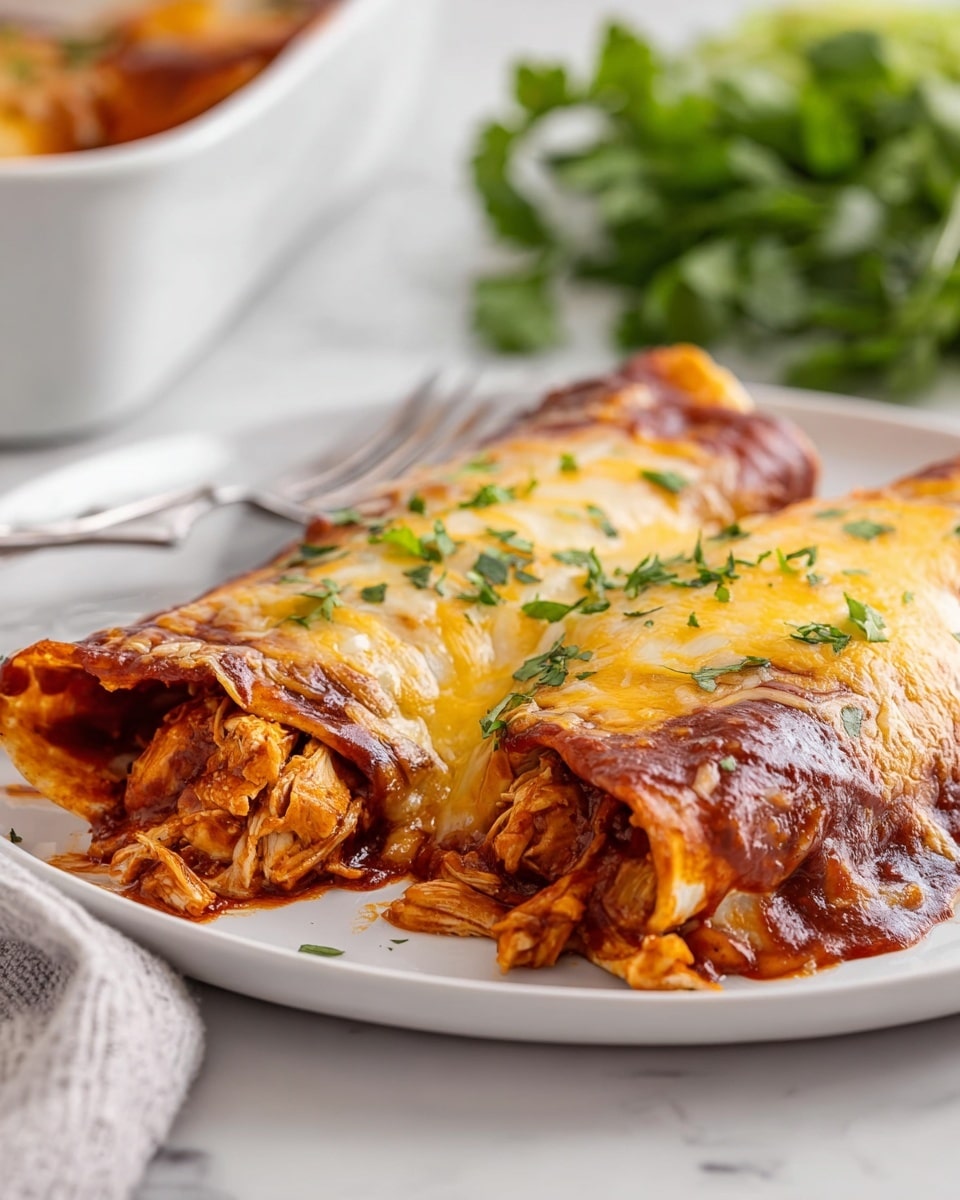
Freezer Chicken Enchiladas Recipe
Let me tell you, this Freezer Chicken Enchiladas Recipe is a total game-changer for busy weeknights or when you’re craving something cozy but don’t want to spend hours in the kitchen. I love that you can prep it ahead of time, freeze it, and then bake it straight from the freezer whenever the mood strikes. Nothing beats coming home to a warm, cheesy, and flavorful dish without the stress of last-minute cooking.
What really makes this recipe special for me is how simple yet satisfying it is. Using rotisserie chicken keeps it luscious and tender, while the combo of sour cream, mild green chilis, and taco seasoning gives the filling a subtle kick that’s not overpowering. You’re going to love how flexible it is too — it’s perfect for meal prepping, feeding a family, or even bringing to a potluck.
Ingredients You’ll Need
These ingredients work beautifully together to deliver creamy, cheesy, slightly tangy enchiladas with just the right hint of spice. If you pick a good-quality rotisserie chicken and fresh ingredients, you’re already halfway to success.
- Unsalted butter: I use this to soften the onion and garlic, adding that silky base flavor without overpowering the filling.
- Sweet yellow onion (Vidalia): The sweetness balances the tang from the sour cream and the heat from the seasoning.
- Minced garlic: Fresh garlic is a must here — it gives that aromatic punch every enchilada needs.
- Diced mild green chilis (4 oz can): Mild heat and a little bit of smokiness make the filling extra tasty without making it too spicy.
- Taco seasoning packet (1 oz): This quick shortcut packs in loads of flavor. You can use homemade if you prefer!
- Sour cream: It makes the filling ultra creamy and tender, and that slight tang brightens up the dish.
- Shredded rotisserie chicken: White and dark meat from about a 2-pound cooked chicken works best — the mix keeps the texture varied and juicy.
- Shredded Colby-Jack cheese (3 cups total): I split the cheese between the filling and topping for melty, gooey goodness every bite.
- Fajita size flour tortillas (6-inch, 12 count): These are just the right size to hold a good amount of filling and roll nicely.
- Red enchilada sauce (19 oz can): Dividing it ensures each pan gets a perfect coating to keep the enchiladas moist and flavorful.
- Fresh cilantro: Optional but highly recommended for that fresh herbal pop just before serving.
Variations
I love tweaking this Freezer Chicken Enchiladas Recipe to suit my mood or diet needs, and you should too! There’s plenty of room to make these enchiladas your own without losing the core flavors.
- Make it spicy: I sometimes swap mild green chilis for a medium or hot variety to give it a kick — just depends on the dinner crowd!
- Veggie-packed: Adding sautéed bell peppers or corn gives it a nice crunch and boosts nutrition without much extra effort.
- Dairy-free option: I’ve swapped out the cheese and sour cream for their vegan versions, and it still comes out beautifully cheesy and creamy.
- Use corn tortillas: For gluten-free eats, corn tortillas work well but warming them properly beforehand helps avoid breakage when rolling.
- Slow cooker filling: When I want the flavors extra melded, I simmer the chicken and seasoning mixture in the slow cooker before assembling.
How to Make Freezer Chicken Enchiladas Recipe
Step 1: Sauté the aromatics to build flavor
Start by melting the butter in a skillet over medium heat. Toss in the diced sweet onion and cook until it’s soft and translucent—this usually takes about 5 minutes. Add the minced garlic last and let it cook just until fragrant, about 30 seconds to a minute, to avoid burning it. This step is crucial because it forms the savory backbone of our filling.
Step 2: Mix the chicken filling
Transfer your sautéed onion and garlic to a large mixing bowl. Stir in the diced mild green chilis and taco seasoning packet, then add the sour cream. Now, fold in the shredded rotisserie chicken and 1 cup of shredded Colby-Jack cheese. Mix everything until it’s well combined and creamy—this is what packs the filling with that perfect savory, cheesy goodness.
Step 3: Assemble the enchiladas
Preheat your oven to 350°F (175°C). Grease two 8×8-inch baking dishes lightly. Spread about ½ cup of red enchilada sauce on the bottom of each pan to prevent sticking and add moisture. Lay out your tortillas and spoon a heaping ¼ cup of the chicken mixture down the center of each one. Roll the tortillas tightly and place them seam-side down in the pans. Sprinkle the remaining cheese evenly over the top, and pour the rest of the enchilada sauce over everything, making sure each roll is covered.
Step 4: Bake or freeze until ready
If you’re making these for dinner right away, bake uncovered for about 25-30 minutes until bubbly and golden on top. If freezing, cover the pans tightly with foil and pop them into the freezer — they’ll keep well for up to 3 months. When you’re ready to bake, simply thaw overnight in the fridge and bake as usual.
How to Serve Freezer Chicken Enchiladas Recipe

Garnishes
I’m all about simplicity when it comes to garnishes with this Freezer Chicken Enchiladas Recipe. A sprinkle of fresh chopped cilantro really brightens it up, and I often add a dollop of sour cream or a few slices of avocado on top — they add a creamy freshness that complements the rich cheese and chicken wonderfully.
Side Dishes
To keep things balanced, I usually serve these enchiladas with a simple side salad dressed with lime vinaigrette or some Mexican rice and refried beans. Roasted veggies like zucchini or corn on the cob also pair nicely if you want something heartier. These sides help round out the meal without taking the spotlight away from your delicious enchiladas.
Creative Ways to Present
For special occasions, I like to sprinkle a bit of crumbled queso fresco and sliced jalapeños over the top before serving to give it a festive flair. You could also serve individual enchilada portions in small cast iron skillets—it looks charming and keeps them warm longer. Adding small bowls of toppings on the side lets everyone customize their own plate!
Make Ahead and Storage
Storing Leftovers
Leftover enchiladas actually taste great the next day. I store mine in airtight containers in the fridge, and they keep well for 3-4 days. When reheating, cover them loosely with foil to avoid drying out and heat until warmed through.
Freezing
This is where the Freezer Chicken Enchiladas Recipe shines — freezing for later makes meal planning a breeze. I freeze the assembled pans just as described and label them with the date. No freezer burn or texture issues if wrapped tight. Just pop them straight in the oven from frozen (adding 15 extra minutes to the baking time) and you’re all set.
Reheating
When reheating leftovers, I prefer the oven to keep that crispy cheesy top. Just place the enchiladas in an oven-safe dish, cover loosely with foil, and heat at 350°F for 15-20 minutes. You can finish without the foil for a few minutes at the end for a nicely browned top. Microwave works too if you’re in a rush, but the texture isn’t quite the same.
FAQs
-
Can I use homemade chicken instead of rotisserie chicken?
Absolutely! You can poach, roast, or grill your chicken breasts or thighs, shred them, and use in the recipe. Just make sure the chicken is fully cooked and shredded into bite-sized pieces for the best texture and flavor.
-
How long can I freeze the enchiladas?
They’ll hold up really well in the freezer for up to 3 months. For the best taste and texture, try to use them within this timeframe and always wrap the pans tightly or store in airtight containers.
-
Can I assemble these enchiladas ahead and bake them later?
Yes! You can assemble and refrigerate for up to 24 hours before baking. Just cover the dish tightly with foil or plastic wrap and bake as usual when ready.
-
Do I need to thaw frozen enchiladas before baking?
Thawing overnight helps them bake more evenly, but you can bake directly from frozen if you add around 15 extra minutes to your baking time. Just keep an eye on the dish to make sure it’s heated through.
-
What if I don’t have Colby-Jack cheese?
You can substitute with a blend of Monterey Jack and mild cheddar cheeses. Mozzarella mixed with cheddar also works but keep in mind the flavor will be a bit different—still delicious!
Final Thoughts
I can’t recommend this Freezer Chicken Enchiladas Recipe enough—it’s become a staple in my meal prep rotation and a comforting go-to when life gets hectic. The ease of making ahead and freezing means you always have a wholesome, home-cooked meal just a bake away. Give it a try, tweak it to your taste, and I promise you’ll find yourself reaching for this recipe again and again, just like I do!
Print
Freezer Chicken Enchiladas Recipe
- Prep Time: 20 minutes
- Cook Time: 30 minutes
- Total Time: 50 minutes
- Yield: 24 enchiladas (12 per pan, serves 8-12 people depending on portion size) 1x
- Category: Main Course
- Method: Baking
- Cuisine: Mexican
Description
These Freezer Chicken Enchiladas are a delicious and convenient meal made with tender rotisserie chicken, flavorful spices, and melted cheese wrapped in soft flour tortillas and topped with rich enchilada sauce. Perfect for preparing ahead and freezing, they save time on busy nights while delivering comforting Mexican-inspired flavors.
Ingredients
Filling
- 1 tablespoon unsalted butter
- ¾ cup small diced sweet yellow Vidalia onion
- 1 tablespoon minced garlic
- 4 ounce can diced mild green chilis
- 1 ounce packet taco seasoning
- ¾ cup sour cream
- 3 cups shredded rotisserie chicken meat (white and dark from a 2 pound cooked, cooled rotisserie chicken)
- 1 cup shredded Colby-Jack cheese
Assembly
- 12 (6 inch) fajita size flour tortillas
- 19 ounce can (approximately 2 cups) red enchilada sauce, divided (½ cup sauce per pan)
- 1 cup shredded Colby-Jack cheese (divided, ½ cup per pan for topping)
Garnish
- 2 tablespoons chopped fresh cilantro (optional)
Instructions
- Prepare the filling: In a skillet over medium heat, melt the unsalted butter. Add the diced Vidalia onion and sauté until softened and translucent, about 5 minutes. Stir in the minced garlic and cook for another 1 minute until fragrant. Mix in the diced mild green chilis and taco seasoning, cooking for 2 minutes more to allow the flavors to meld.
- Combine filling ingredients: Remove the skillet from heat. Stir in the sour cream, shredded rotisserie chicken, and 1 cup of shredded Colby-Jack cheese. Mix thoroughly until all ingredients are well incorporated and the cheese starts to melt into the mixture.
- Assemble enchiladas: Preheat your oven to 350°F (175°C). Spread about ¼ cup of red enchilada sauce evenly in the bottom of two 9×13 inch baking pans (about ½ cup sauce per pan). Place a fajita size flour tortilla on a flat surface, spoon approximately ⅓ cup of the chicken filling down the center of each tortilla, then roll it up tightly. Place the rolled enchilada seam-side down in the prepared pan. Repeat with remaining tortillas and filling.
- Add sauce and cheese topping: Pour the remaining red enchilada sauce evenly over the top of the enchiladas in each pan. Sprinkle the remaining 1 cup of shredded Colby-Jack cheese equally over the sauce-covered enchiladas, distributing ½ cup of cheese per pan.
- Bake the enchiladas: Cover each pan with aluminum foil and bake uncovered in the preheated oven for 25-30 minutes or until the cheese is melted, bubbly, and slightly browned around the edges.
- Garnish and serve: Remove the pans from the oven and let cool slightly for 5 minutes. Sprinkle freshly chopped cilantro over the top (optional). Serve warm for a comforting and flavorful meal. These enchiladas can also be cooled completely and frozen for later use.
Notes
- Use rotisserie chicken to save time and add rich flavor.
- This recipe can be doubled or halved depending on your needs.
- Can be prepared ahead and frozen before baking; thaw overnight in the fridge before baking.
- If you want a spicier dish, choose diced green chilis with medium or hot heat level.
- Substitute corn tortillas if you prefer gluten free, but keep in mind texture differences.
- Use low-fat sour cream to lighten the recipe if desired.
