
Healthy Lemon Bars Recipe
If you’re anything like me and adore a tangy, light dessert that feels indulgent but doesn’t weigh you down, this Healthy Lemon Bars Recipe is going to be your new best friend. I love how these bars manage to be refreshingly zesty with real, clean ingredients that you can actually feel good about — no refined sugar or flour lurking here. It’s the perfect balance of sweet and tart that brightens up any afternoon or rounds out a dinner party with just the right zing.
Whenever I make these, I think about how well they fit every occasion—from casual weekend treats to sophisticated gatherings. Because of the coconut flour crust and natural sweetener, they’re a bit unique and totally memorable. I’m excited to share all my tips with you so your Healthy Lemon Bars Recipe turns out as delicious and satisfying as the ones I’ve made time and again.
Ingredients You’ll Need
Each ingredient here plays its part in layering lovely flavors and textures — plus, I picked options that make this recipe healthier but just as tasty. A quick tip? Look for fresh lemons and quality maple syrup to really let the flavors shine.
- Maple syrup: I prefer pure grade A maple syrup for its rich flavor and natural sweetness; it’s what keeps these bars wholesome.
- Ghee: Adds a buttery, nutty richness without dairy’s heaviness and helps bind the crust perfectly.
- Eggs: They’re key for structure and moisture—fresh ones make a real difference.
- Coconut flour: It creates a tender crust that’s naturally gluten-free. Just be sure to measure carefully since it absorbs moisture differently than regular flour.
- Tapioca flour: Helps with binding and gives the filling a nice, slightly chewy texture once baked.
- Lemon zest: I always zest just before baking to keep that fresh, vibrant citrus kick.
- Vanilla extract: Adds subtle warmth and complexity that balances the lemon’s brightness.
- Lemon juice: Freshly squeezed is a must—bottled juice just can’t compete, and freshness really shines through.
Variations
One of the things I love about this Healthy Lemon Bars Recipe is how flexible it can be—don’t hesitate to tweak it to fit your preferences or what you have on hand.
- Gluten-free: This recipe is naturally gluten-free thanks to coconut and tapioca flours, which is perfect if you’re avoiding gluten.
- Keto-friendly: You can swap maple syrup for a keto-approved sweetener like erythritol or monk fruit blend; I’ve tried it and it keeps the bars tasty with less sugar.
- Berry twist: Adding a handful of fresh raspberries or blueberries on top before baking brings a lovely color and fresh berry flavor.
- Herbal zing: Stir in some finely chopped fresh basil or thyme into the filling for a gourmet touch I started experimenting with recently—and loved.
How to Make Healthy Lemon Bars Recipe
Step 1: Whip up the perfect crust
Start by preheating your oven to 325°F (160°C). In a mixing bowl, combine the melted and cooled ghee with the maple syrup, egg, and vanilla extract. Then, stir in the coconut flour, tapioca flour, and lemon zest. The dough will be slightly sticky but should hold together when pressed. Press this mixture evenly into an 8×8-inch pan lined with parchment paper—this helps with easy removal later. Bake it for about 15 minutes until it’s just golden around the edges. I find pressing it firmly makes sure the crust stays together and doesn’t crumble when you cut the bars.
Step 2: Mix the luscious lemon filling
While the crust is baking, whisk together the eggs, lemon juice, lemon zest, maple syrup, and tapioca flour in a separate bowl. Make sure the tapioca flour is fully dissolved to avoid lumps—this helps the filling set beautifully with that perfect chewy texture. Once your crust has had that 15-minute bake, immediately pour this filling mixture over it and slide it back into the oven.
Step 3: Bake and cool to set
Bake the lemon bars for around 20–22 minutes or until the filling is just set—they should jiggle slightly in the center but not be liquid. Don’t overbake or they’ll dry out and lose their delightful softness. Once done, let them cool completely on a wire rack, then pop them in the fridge for at least an hour. This chilling step is crucial for firm bars that cut clean and taste amazing.
How to Serve Healthy Lemon Bars Recipe

Garnishes
I love a light dusting of powdered sugar or, for a healthier touch, a sprinkle of finely chopped fresh mint leaves. Sometimes I zest a little extra lemon on top right before serving for that fresh pop of color and flavor.
Side Dishes
These lemon bars pair wonderfully with a cup of green tea or a dollop of Greek yogurt on the side if you want some creaminess without extra sweetness. I’ve also served them with a fresh berry salad for brunch—such a fresh, vibrant combo!
Creative Ways to Present
For a party, I like cutting them into bite-sized squares and arranging them on a pretty platter with edible flowers and thin lemon slices. It makes a simple dessert look fancy and inviting without extra effort.
Make Ahead and Storage
Storing Leftovers
I keep any leftover bars in an airtight container in the refrigerator. They stay fresh for about 4-5 days, and because of the natural ingredients, they don’t get soggy or lose their texture.
Freezing
I’ve frozen these bars before by wrapping them tightly in plastic wrap and placing them in a freezer-safe bag. When thawed in the fridge overnight, they taste almost as fresh as the day I made them, perfect for prepping ahead of time.
Reheating
If you want to enjoy them warm, I gently reheat single bars in the microwave for about 10-15 seconds. Just enough to bring out those vibrant lemon flavors without melting the filling completely.
FAQs
-
Can I use regular flour instead of coconut and tapioca flours?
You absolutely can substitute with all-purpose flour if you’re not worried about gluten or grain-free options. Use about 3/4 cup all-purpose flour for the combined amount of coconut and tapioca flours, but keep an eye on the texture since coconut flour is more absorbent. You might want to slightly reduce the liquid if needed.
-
How tart are these lemon bars?
These Healthy Lemon Bars Recipe strikes a nice balance — they’re bright and lemony, but the natural sweetness from maple syrup softens the tartness just right. If you prefer it sweeter, just add a little more maple syrup to the filling to suit your taste.
-
Can I make these bars vegan?
This recipe depends on eggs and ghee for structure and flavor, so going fully vegan is tricky without drastically changing the texture. However, you could experiment with flax eggs and plant-based butter, but results may vary.
-
What’s the best way to zest lemons?
I recommend using a microplane zester for the finest zest—it releases oils and flavor without any bitter pith. Always zest before juicing for the freshest, most fragrant lemon flavor.
Final Thoughts
Honestly, this Healthy Lemon Bars Recipe has become a staple in my kitchen because it feels like a treat and a health win all at once. If you’re craving something fresh, zesty, and naturally sweetened, this is a recipe you’ll want to keep coming back to. I’m so glad I can share it with you—it’s one of those delightful desserts that’s surprisingly simple but really impressive. Go ahead, give it a try and watch your friends and family ask for seconds (and the recipe)!
Print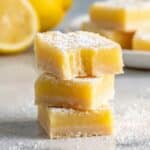
Healthy Lemon Bars Recipe
- Prep Time: 15 minutes
- Cook Time: 35 minutes
- Total Time: 2 hours 50 minutes
- Yield: 9–12 bars 1x
- Category: Dessert
- Method: Baking
- Cuisine: American
- Diet: Gluten Free
Description
This Healthy Lemon Bars recipe offers a deliciously tangy and sweet dessert option made with natural ingredients like maple syrup, coconut and tapioca flours, and fresh lemons. Featuring a tender, gluten-free crust and a vibrant lemon filling, these bars are perfect for a refreshing treat that balances zingy citrus flavor with subtle sweetness.
Ingredients
Crust
- 1/4 cup maple syrup
- 1/3 cup ghee, melted and cooled
- 1 large egg
- 2/3 cup Bob’s Red Mill Coconut Flour
- 1/4 cup Bob’s Red Mill Tapioca Flour
- ½ teaspoon lemon zest (zest of about 1/2 lemon)
- 2 teaspoons vanilla extract
Filling
- 1/2 cup lemon juice, freshly squeezed (about 4–5 lemons depending on size)
- 1 1/2 tablespoons lemon zest (about zest of 2 lemons)
- 1/3 cup maple syrup
- 4 large eggs
- 2 tablespoons tapioca flour
Instructions
- Prepare the crust: In a medium bowl, whisk together the maple syrup, melted and cooled ghee, and 1 large egg until well combined. Add the coconut flour, tapioca flour, lemon zest, and vanilla extract, mixing thoroughly to form a smooth dough. The dough should be moist but manageable for pressing into the pan.
- Press the crust into the pan: Line an 8×8-inch baking pan with parchment paper for easy removal. Press the crust mixture evenly into the bottom of the pan, ensuring a uniform thickness to provide a sturdy base for the lemon filling.
- Bake the crust: Preheat your oven to 350°F (175°C). Bake the crust for about 12-15 minutes, or until it just starts to set and turn golden around the edges. Remove from the oven and allow it to cool slightly while preparing the filling.
- Make the lemon filling: In a mixing bowl, whisk together the freshly squeezed lemon juice, lemon zest, maple syrup, 4 large eggs, and 2 tablespoons tapioca flour. Whisk continuously until the mixture is smooth and well combined; this will help thicken the filling as it bakes.
- Combine and bake: Pour the lemon filling evenly over the pre-baked crust. Return the pan to the oven and bake at 350°F (175°C) for 20-25 minutes, or until the filling is set and no longer jiggly in the center.
- Cool and chill: Remove the lemon bars from the oven and let them cool to room temperature on a wire rack. Once cooled, place them in the refrigerator for at least 2 hours to fully set and firm up, improving flavor and texture.
- Serve: Once chilled, remove the bars from the pan using the parchment paper edges. Cut into squares and serve chilled for the best lemony freshness and texture.
Notes
- Using fresh lemon juice and zest is key to achieving the vibrant citrus flavor.
- The crust is gluten-free due to the use of coconut and tapioca flours.
- Maple syrup is used as a natural sweetener, making this recipe refined sugar-free.
- Allow ample chilling time to achieve firm lemon bars that hold together well.
- Store leftover lemon bars in an airtight container in the refrigerator for up to 5 days.


