
Colorful Christmas Fudge Recipe
I have to tell you, this Colorful Christmas Fudge Recipe is one of my all-time favorite holiday treats to whip up. It’s bright, festive, and ridiculously easy to make, which is a perfect combo when the holiday hustle is in full swing. I love pulling out those vibrant red and green layers that feel just like Christmas wrapped up in a creamy bite-sized delight.
What really makes this recipe stand out is how smoothly it comes together, plus that creamy melt-in-your-mouth texture that everyone asks for at gatherings. Whether you’re gifting it to friends, taking it to a party, or just sneaking bites while wrapping presents, this fudge feels like the sweetest little celebration. You’ll find yourself coming back for more once you try this Colorful Christmas Fudge Recipe!
Ingredients You’ll Need
This recipe keeps things simple but special—the ingredients complement each other perfectly to give you that smooth, chewy fudge with brilliant holiday colors. A quick tip: choosing quality white chocolate chips really up the game on flavor and texture.
- White chocolate chips: I recommend Ghirardelli for their creamy texture and rich flavor.
- Sweetened condensed milk: This is the secret to that luscious fudge texture and sweetness.
- Unsalted butter: Use cold, cubed butter to help balance richness and add smoothness.
- Red gel food coloring: Americolor brand works great; gel food coloring keeps the fudge from getting runny.
- Green gel food coloring: Same as red—gel is best to maintain vibrant colors.
Variations
One of my favorite things about this Colorful Christmas Fudge Recipe is how easy it is to personalize. You can swap colors, add mix-ins, or tweak flavors to suit your holiday vibe or dietary needs.
- Mint flavor: Adding a few drops of peppermint extract in the base makes it smell and taste like a winter wonderland. Trust me, it’s a crowd pleaser.
- Nutty twist: Toss in chopped pecans or walnuts for a bit of crunch I love the texture contrast.
- Dairy-free version: Use vegan white chocolate chips and a coconut milk-based condensed milk alternative to keep it creamy without dairy.
- Color swap: If you’re feeling creative, try blue and silver gel coloring for a frosty vibe instead of traditional red and green.
How to Make Colorful Christmas Fudge Recipe
Step 1: Melt and Mix the Base
Start by combining your white chocolate chips, sweetened condensed milk, and butter in a medium heatproof bowl. I like to do this over a double boiler for gentle, even melting—just place the bowl over a pot of simmering water and stir constantly. This way, nothing scorches, and your fudge stays perfectly smooth. Once it’s silky and combined, remove it from heat and allow it to cool slightly before dividing for coloring.
Step 2: Divide and Add Color
Here’s where the magic happens! Scoop half of your fudge base into a separate bowl, then add your red gel food coloring a little at a time, mixing well until you get that perfect shade of Christmas red. Repeat with the other half and green gel coloring. The gel colors are strong, so go slow—you can always add more if you want brighter colors.
Step 3: Layer and Chill
Line an 8×8-inch pan with parchment paper and pour in the red fudge first, spreading it evenly. Pop it in the freezer for about 10-15 minutes, just until it firms up a bit but isn’t fully hard. Then, gently spoon the green fudge layer on top and smooth it out. The freeze helps keep the layers distinct instead of blending together—trust me, that clean color separation really wows guests!
Step 4: Final Chill and Cut
Place the pan in the fridge or freezer until the fudge sets completely, usually a couple of hours. When it’s firm, lift the parchment paper and transfer the whole slab to a cutting board. Use a sharp knife to cut into bite-sized squares. Tip: wipe the knife with a warm damp cloth between cuts to keep edges smooth.
How to Serve Colorful Christmas Fudge Recipe

Garnishes
I often top a few pieces with festive sprinkles or crushed candy canes for some extra holiday sparkle and crunch. A dusting of edible glitter can also add that whimsical, gift-worthy touch that makes your fudge stand out on the dessert table.
Side Dishes
Serve your fudge alongside a cup of hot peppermint tea or spiced cocoa—it’s like a cozy holiday hug in every bite. I’ve also seen it paired beautifully with a board of cheeses for a sweet-and-savory holiday nibble platter.
Creative Ways to Present
For gift giving, I love wrapping small stacks of fudge in wax paper tied with twine and sprigs of rosemary or holly. If you’re serving at a party, set the fudge on a festive platter layered over a bright napkin—those colors really pop! You could even cut the fudge into fun shapes using cookie cutters for an added merry surprise.
Make Ahead and Storage
Storing Leftovers
I store leftover fudge in an airtight container layered between parchment paper to prevent sticking. It keeps beautifully at room temperature for about a week, but I usually tuck mine in the fridge to extend freshness. Just remember to bring it back to room temp before serving—that perfect soft bite really shines then.
Freezing
Freezing works wonderfully for this fudge. I’ve frozen extra batches wrapped tightly in plastic wrap and sealed in freezer bags with no issues. When you’re ready, thaw it in the refrigerator overnight, then let it sit at room temperature for an hour so it softens up nicely without become crumbly.
Reheating
Since fudge is best enjoyed at room temperature, I don’t recommend traditional reheating. Instead, just let any chilled or frozen fudge rest out for a bit. If you’re in a rush, a few seconds at low power in the microwave can soften it—but watch carefully so it doesn’t melt completely.
FAQs
-
Can I use regular liquid food coloring instead of gel for the Colorful Christmas Fudge Recipe?
It’s best to use gel food coloring because it has a thicker consistency and won’t affect the fudge’s texture. Liquid food coloring can make the fudge too runny or alter its consistency, which might prevent it from setting properly.
-
How long does this Colorful Christmas Fudge Recipe stay fresh?
Stored in an airtight container at room temperature, your fudge will stay fresh for up to a week. Refrigerating can extend that to about two weeks, but always let it warm a bit before serving for the best texture.
-
Can I make this fudge without white chocolate chips?
White chocolate chips give this fudge its creamy, sweet base and help the colors pop. While you might experiment using other types of chocolate, the texture and color vibrancy likely won’t be the same.
-
How do I prevent the layers from mixing together?
The key is to chill the first color layer until it’s firm but not frozen before adding the second. This creates a solid base that keeps your colors distinct and the fudge looking neat and festive.
-
Is this recipe kid-friendly to make?
Absolutely! Kids love helping pour and spread the colored fudge layers. Just make sure to supervise around the hot melting stage and cutting to keep everyone safe and happy.
Final Thoughts
This Colorful Christmas Fudge Recipe holds a special place in my heart because it always brings joy and a touch of magic to the holiday season. It’s one of those recipes that’s easy enough for a last-minute treat but impressive enough to share at holiday gatherings. I hope you enjoy making it as much as I do—nothing beats that smile when someone takes their first festive bite! So go ahead, grab your ingredients, and let’s add a little colorful sweetness to your Christmas celebrations.
Print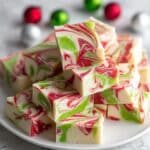
Colorful Christmas Fudge Recipe
- Prep Time: 10 minutes
- Cook Time: 10 minutes
- Total Time: 3 hours 20 minutes
- Yield: 36 pieces 1x
- Category: Dessert
- Method: Stovetop
- Cuisine: American
Description
This Colorful Christmas Fudge recipe is a festive and easy-to-make sweet treat perfect for the holiday season. Rich and creamy white chocolate fudge is enhanced with vibrant red and green gel food coloring, offering a delightful twist to traditional fudge that’s as visually appealing as it is delicious.
Ingredients
Fudge Base
- 22 oz (2 11-oz. bags) white chocolate chips (Ghirardelli recommended)
- 14 oz can sweetened condensed milk
- 4 tablespoons unsalted butter, cold and cut into small cubes
Coloring
- ¼–½ teaspoon red gel food coloring (Americolor brand suggested)
- ¼–½ teaspoon green gel food coloring (Americolor brand suggested)
Instructions
- Prepare the Fudge Mixture: In a medium saucepan over low heat, combine the white chocolate chips and sweetened condensed milk. Stir continuously until the chocolate chips are completely melted and the mixture is smooth and creamy.
- Add Butter: Remove the saucepan from heat and immediately add the cold, cubed unsalted butter. Stir until the butter has fully melted and is incorporated into the fudge mixture, ensuring a rich, glossy texture.
- Divide and Color: Divide the fudge mixture evenly into three separate bowls. Add red gel food coloring to one bowl and green gel food coloring to another bowl, adjusting the amount between ¼ and ½ teaspoon depending on your desired color intensity. Leave the third bowl plain for white fudge. Stir each bowl thoroughly to evenly distribute the color.
- Layer the Fudge: Line a square baking dish with parchment paper. Spoon dollops of each colored fudge mixture into the dish, alternating colors to create a festive, marbled Christmas effect. Use a toothpick or skewer to gently swirl the colors together for an attractive design.
- Chill and Set: Place the baking dish in the refrigerator and chill the fudge for at least 3 hours or until fully set and firm.
- Slice and Serve: Once set, lift the fudge from the dish using the parchment paper and cut into small squares. Serve chilled or at room temperature and enjoy your colorful Christmas fudge!
Notes
- Use gel food coloring for vibrant colors; liquid colorings may alter the fudge texture.
- Ensure the butter is cold before adding to help achieve a smooth fudge texture.
- For easier slicing, let the fudge sit at room temperature for a few minutes before cutting.
- Store fudge in an airtight container in the refrigerator for up to 2 weeks.
- Feel free to add festive sprinkles or edible glitter on top before chilling for extra holiday flair.


