
Chocolate Kiss Crinkle Cookies Recipe
If you’re looking for a cookie that combines rich chocolatey goodness with a delightful melt-in-your-mouth texture, you’re going to love this Chocolate Kiss Crinkle Cookies Recipe. These cookies are basically brownie mix transformed into stunning, crackly gems with a surprise Hershey Kiss nestled right in the center. The combination of fudgy brownie, espresso hints, and that sweet chocolate kiss makes these cookies a total crowd-pleaser whether you’re baking for a holiday party, a cozy night in, or just because you deserve a treat.
I’ve made these cookies more times than I can count, and what I appreciate most is how they come together quickly, yet look and taste like you spent hours perfecting them. Plus, that light powdered sugar coating gives them such a festive feel and gorgeous crinkle effect. Trust me, once you try this Chocolate Kiss Crinkle Cookies Recipe, you’ll find yourself reaching for it every time you want an easy but impressive chocolate dessert.
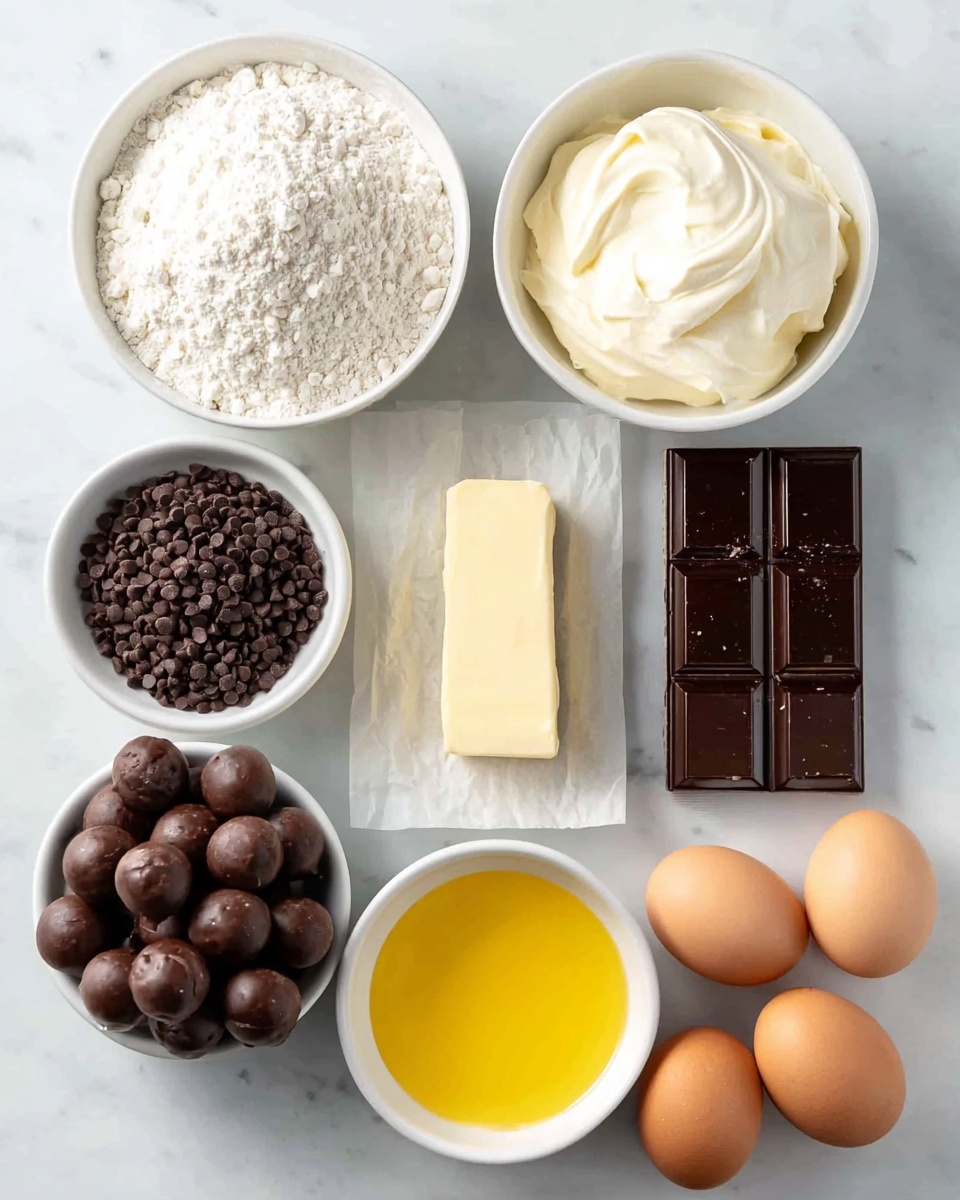
Ingredients You’ll Need
All these ingredients work together perfectly to build a fudgy, tender cookie with a deep chocolate flavor and a little boost from espresso powder that really enhances the chocolate without tasting like coffee. Here are a few shopping tips to keep in mind for the best results.
- Brownie mix: I recommend Ghirardelli dark chocolate brownie mix because it has intense chocolate flavor and helps the cookies stay chewy.
- Flour: Just regular all-purpose flour works fine here. It helps stabilize the dough so the cookies don’t spread too much.
- Cream cheese: Make sure it’s softened at room temperature. It adds moisture and richness, making the texture decadent.
- Espresso powder: This is optional, but it really amps up the chocolate flavor. Even if you’re not a coffee drinker, you won’t taste coffee—just a deeper chocolate note.
- Unsalted butter: Melted butter binds the dough and adds flavor, so don’t substitute with oil here.
- Eggs: Helps with structure and gives the cookies that chewy brownie texture.
- Powdered sugar: For that classic crinkle look and a subtle sweetness on the crust.
- Hershey Kisses: Any flavor you like, but I personally love using original milk chocolate or even the almond fill variety for a nutty surprise.
Variations
One of the things I love about the Chocolate Kiss Crinkle Cookies Recipe is how easy it is to switch things up. You can definitely tailor it to your taste or dietary needs without losing any of the magic. Here are a few of my favorite tweaks based on what I’ve tried and what works best.
- Gluten-Free Variation: Swap the all-purpose flour with your favorite gluten-free blend. I’ve done this multiple times and the results are just as fudgy and delicious.
- Dark Chocolate Delight: Use dark chocolate Hershey Kisses and a darker brownie mix for extra richness. This is perfect if you want a more intense chocolate hit.
- Mint Twist: Replace espresso powder with peppermint extract and use mint-flavored Hershey Kisses. It makes the cookies festive and refreshing, especially around the holidays.
How to Make Chocolate Kiss Crinkle Cookies Recipe
Step 1: Whip up the cookie dough
Start by melting your unsalted butter gently—microwave or stovetop works. Once melted, mix it with the brownie mix, flour, softened cream cheese, espresso powder, and eggs until everything is just combined. The dough will be thick and fudgy, which is exactly what you want. Don’t overmix, or the cookies might turn out tough.
Step 2: Chill the dough for easier handling
I always refrigerate the dough for at least 30 minutes. This makes the dough easier to scoop and prevents the cookies from spreading too much while baking. If you’re short on time, 15 minutes can do, but the texture shines best when chilled.
Step 3: Roll, coat, and press in the kiss
Preheat your oven to 350°F (175°C). Scoop a tablespoon of dough and roll it into a ball, then generously coat it in powdered sugar. Place the cookie dough balls on your baking sheet about 2 inches apart. Bake for 10 minutes, then pull the tray out and gently press a Hershey Kiss into the center of each cookie. Return the cookies to the oven and bake another 2-3 minutes until the edges set but the center remains soft.
Step 4: Cool and enjoy
Let the cookies cool on the baking sheet for about 5 minutes before transferring them to a wire rack. This gives the chocolate kiss time to settle without cracking the cookie too much. You’ll notice that lovely crinkle pattern on top and a gooey center—just perfect!
How to Serve Chocolate Kiss Crinkle Cookies Recipe
Garnishes
I usually skip extra garnishes since these cookies are pretty on their own, but if you want to dress them up, a light dusting of extra powdered sugar or a drizzle of melted white chocolate over the top works beautifully. Sometimes, I sprinkle a pinch of sea salt to contrast the sweetness—it’s heavenly.
Side Dishes
Pair these cookies with a glass of cold milk, a rich cup of coffee, or even a scoop of vanilla ice cream for an indulgent dessert. I love serving them alongside fresh berries to balance out all the chocolate richness.
Creative Ways to Present
For special occasions, I arrange these cookies on a festive serving platter, nestling fresh mint leaves and edible flowers around them for a burst of color. Another idea I tried was placing one cookie in a clear cellophane bag tied with a ribbon—makes a simple but heartfelt gift!
Make Ahead and Storage
Storing Leftovers
I store leftover cookies in an airtight container at room temperature for up to 3 days. To keep them from getting soft, I add a piece of parchment paper between layers. If you want to keep them chewy, this method works perfectly.
Freezing
These cookies freeze beautifully—both the dough and baked cookies. I like to freeze the dough balls rolled and coated in powdered sugar on a tray first, then transfer them to a freezer bag for up to 2 months. That way, you can bake fresh cookies whenever a craving strikes. Baked cookies freeze well tucked into containers with wax paper.
Reheating
When you’re ready to enjoy frozen baked cookies, just pop them in the microwave for about 10-15 seconds or warm them gently in a 300°F oven for 5 minutes. This revives the softness and gooey center like they’re fresh from the oven.
FAQs
-
Can I use a different type of chocolate instead of Hershey Kisses?
Absolutely! Feel free to experiment with peanut butter cups, caramel-filled chocolates, or even small pieces of your favorite chocolate bar. Just make sure the size fits nicely into the center of each cookie.
-
Do I have to use espresso powder in the chocolate kiss crinkle cookies recipe?
Nope, espresso powder is optional but highly recommended. It enhances the chocolate flavor without adding a coffee taste, giving your cookies a deeper richness that’s hard to beat.
-
Why do I need to chill the dough before baking?
Chilling the dough firms it up, making it easier to handle and preventing the cookies from spreading too much in the oven, which helps achieve that perfect crinkle look and chewy texture.
-
Can I make these cookies dairy-free?
With some substitutions, yes! Use dairy-free cream cheese and butter alternatives, and be sure the brownie mix you choose is dairy-free. You might need to experiment a bit to get the texture just right.
Final Thoughts
This Chocolate Kiss Crinkle Cookies Recipe holds a special place in my kitchen because it’s such an effortless way to create something that feels both homemade and luxe. Every time I make them, friends ask if I spent hours baking, but really it’s just a little brownie mix magic. Give this recipe a go—you’ll find it’s a total winner for gift-giving, celebrations, or those everyday moments when you want to share a little love through chocolate.
Print
Chocolate Kiss Crinkle Cookies Recipe
- Prep Time: 15 minutes
- Cook Time: 12 minutes
- Total Time: 1 hour 27 minutes
- Yield: 24 cookies 1x
- Category: Dessert
- Method: Baking
- Cuisine: American
Description
These Chocolate Kiss Crinkle Cookies combine the rich fudgy texture of brownie mix with a delightful crinkly powdered sugar exterior and a surprise Hershey’s Kiss center. Perfect for chocolate lovers wanting a quick, easy, and impressive cookie that’s chewy, chocolatey, and irresistibly sweet with a hint of espresso flavor.
Ingredients
Cookie Dough
- 1 box brownie mix (18–20 oz), preferably Ghirardelli dark chocolate mix
- ½ cup all-purpose flour (60 grams)
- 1 oz cream cheese, softened
- 1½ tsp espresso powder
- ½ cup unsalted butter, melted
- 2 large eggs
Coating & Topping
- 1 cup powdered sugar
- 24 Hershey’s Kisses, any flavor
Instructions
- Prepare the dough: In a large mixing bowl, combine the brownie mix, flour, softened cream cheese, espresso powder, melted butter, and eggs. Mix well until a uniform, smooth dough forms, ensuring all ingredients are thoroughly incorporated.
- Chill the dough: Cover the dough with plastic wrap and refrigerate for at least 1 hour to firm up. This will make the dough easier to handle and help create defined crinkles when baked.
- Preheat and prepare baking sheets: Heat your oven to 350°F (175°C). Line two baking sheets with parchment paper or silicone baking mats to prevent sticking.
- Form cookie balls: Scoop tablespoon-sized portions of dough and roll them into balls. Roll each ball generously in powdered sugar to coat completely, then place them on the prepared baking sheets, spacing them about 2 inches apart to allow for spreading.
- Bake the cookies: Bake the cookies for 10–12 minutes or until the edges are set but the centers still look slightly soft. This ensures a chewy texture inside.
- Add Hershey’s Kisses: Immediately upon removing the cookies from the oven, press one Hershey’s Kiss gently into the center of each cookie. The warmth will slightly melt the cookies and help the chocolate adhere.
- Cool the cookies: Let the cookies cool on the baking sheets for 5 minutes before transferring them to a wire rack to cool completely. This prevents the cookies from breaking and allows the chocolate centers to set properly.
Notes
- If you prefer a stronger coffee flavor, you can increase the espresso powder to 2 tsp.
- Ensure the cream cheese is softened to prevent lumps in the dough.
- For a gluten-free version, use a gluten-free brownie mix and flour substitute.
- Store cookies in an airtight container at room temperature for up to 5 days.
- These cookies freeze well – wrap individually and freeze for up to 2 months.


