
Cherries in the Snow Recipe
Cherries in the Snow Recipe is one of those delightful desserts that’s both simple to put together and impressive enough for guests or family gatherings. It’s a layered treat that combines creamy, fluffy textures with the sweet, tangy pop of cherry pie filling, making every bite feel like a little winter celebration. I’ve made this a handful of times for potlucks and holiday parties, and it always disappears fast!
What I love most about the Cherries in the Snow Recipe is its versatility — it’s perfect when you want a no-fuss dessert that’s still elegant and comforting. Plus, it doesn’t require any baking, which makes it a lifesaver on busy days. If you have a soft spot for creamy cherry desserts, this one will quickly become a favorite in your recipe box.
Ingredients You’ll Need
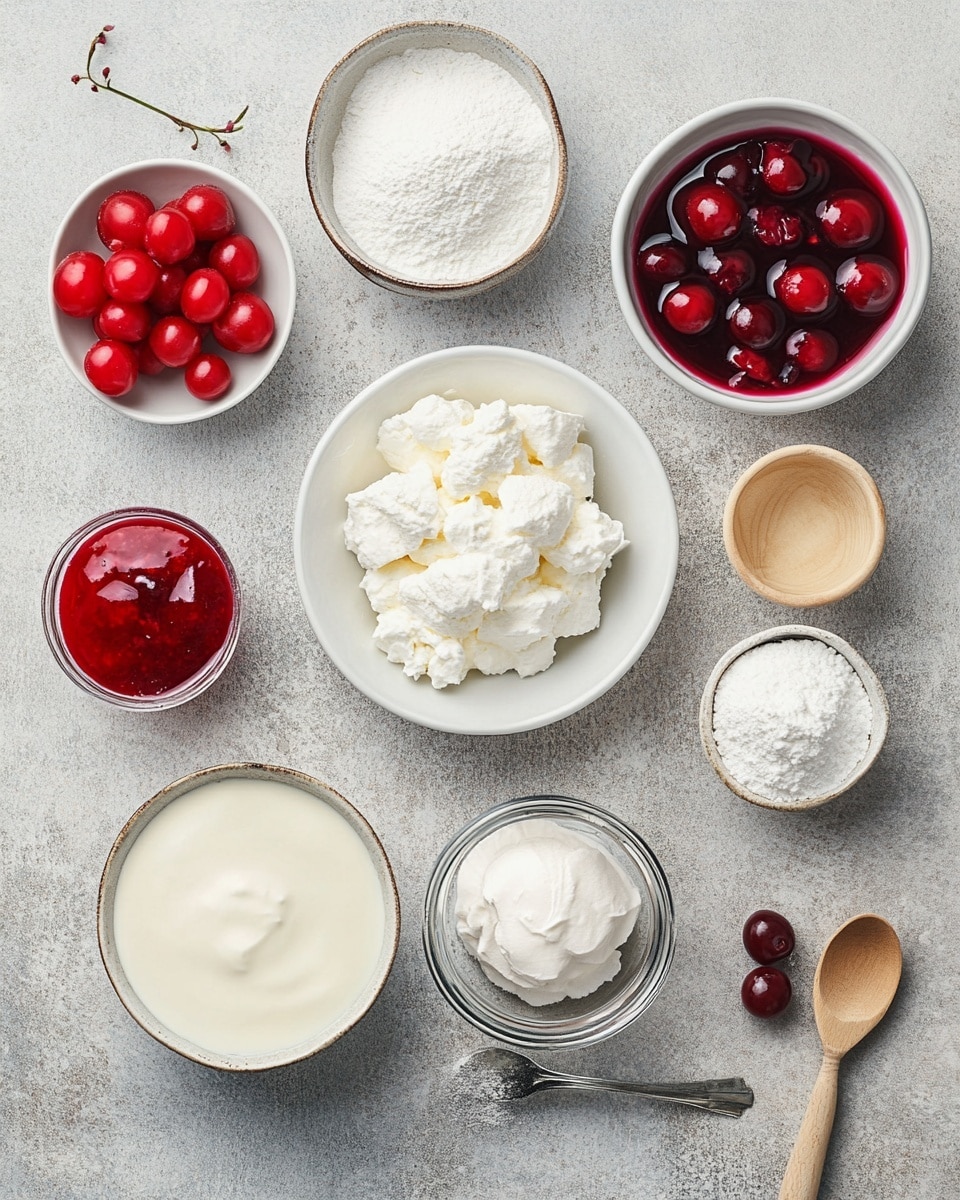
This recipe relies on familiar ingredients that come together beautifully, giving you a creamy texture balanced by the bright cherry topping. When shopping, I always suggest using a good-quality cherry pie filling and making sure your cream cheese is softened for easy mixing.
- Cream Cheese: Softened is key here for smooth blending without lumps.
- Powdered Sugar: Sift it if you can to avoid any lumps in your cream mixture.
- Whole Milk: Adds just the right amount of moisture and richness.
- Vanilla Extract: A splash enhances the overall flavor and ties the layers together.
- Frozen Whipped Topping: Thawed and cold; I usually use Cool Whip for that perfect fluffy texture.
- Angel Food Cake: Pre-baked and torn into chunks; helps create those light, airy layers.
- Cherry Pie Filling: I recommend quality brands like Comstock for that authentic, sweet-tart cherry flavor.
Variations
I like to mix things up sometimes by customizing the Cherries in the Snow Recipe to suit different occasions or dietary needs. Feel free to play around with the components to find your perfect combo.
- Use Fresh Cherries: When cherries are in season, I’ve swapped out canned pie filling for fresh cherries cooked down with a little sugar — it adds a fresher, more natural cherry flavor.
- Greek Yogurt Instead of Whipped Topping: For a tangier twist and lighter texture, replacing the whipped topping with Greek yogurt works well.
- Gluten-Free Angel Food Cake: If you’re gluten-sensitive, a gluten-free angel food cake keeps things just as airy and delicious.
- Add Nuts: Toasted almonds or pecans sprinkled between layers add a great crunch and a nutty depth.
How to Make Cherries in the Snow Recipe
Step 1: Whip Up the Creamy Layer
Start by beating the softened cream cheese until it’s entirely smooth — no lumps here! Then sift in the powdered sugar to keep the texture silky. Add milk and vanilla extract, mixing gently until everything’s combined nicely. Lastly, fold in the thawed whipped topping; this keeps the mixture light as air. I find patience here pays off; folding instead of stirring makes all the difference in fluffiness!
Step 2: Prepare the Cake Base
Tear your pre-baked angel food cake into bite-sized pieces—about ¾ to 1 inch. This is super easy and adds a soft, spongy texture that soaks up the cream without turning soggy quickly. When I layer, I like the pieces to be uniform so every forkful gets that perfect balance of cake and creamy goodness.
Step 3: Assemble Your Layers
Grab a clear trifle bowl or any deep dish so you can see the beautiful layers. Start with a layer of torn angel food cake, then spread half of the creamy mixture over it. After that, spoon half of the cherry pie filling on top. Repeat the layers ending with the cherry pie filling—it creates that signature “snowy” cherry topping. I like to chill it for a few hours before serving so the flavors marry together beautifully.
How to Serve Cherries in the Snow Recipe
Garnishes
I typically keep garnishes simple — a few fresh mint leaves or a light dusting of powdered sugar adds a lovely, fresh contrast. Sometimes, I add a couple of whole cherries on top for a festive, inviting look. It’s all about subtle touches that highlight the cherry theme without overwhelming.
Side Dishes
This dessert pairs beautifully with a cup of strong coffee or a glass of sparkling wine if you’re celebrating. For something heartier, I’ve served it alongside a fresh green salad and light chicken dishes — the sweetness of the dessert balances out savory mains really well.
Creative Ways to Present
For a special occasion, I’ve layered the Cherries in the Snow Recipe into individual glass parfait cups — they look so charming and help with portion control! You could also try layering in a clear jar for a picnic or gift it to a friend in a pretty container. Presentation brings that extra wow factor without much extra effort.
Make Ahead and Storage
Storing Leftovers
I store leftovers covered tightly in the fridge and find they keep wonderfully for up to 3 days. Just give it a gentle stir or fluff with a spoon before serving again to breathe some life back into the layers. It’s great for prepping in advance and still tasting fresh later!
Freezing
While I don’t usually freeze the assembled dessert because the texture can change, you can freeze the cream cheese mixture or cherry pie filling separately. When I tried freezing the whole dessert once, the whipped topping lost its fluffiness, so I’d recommend freezing components if you want to prep early.
Reheating
This dessert is best enjoyed cold, so no reheating needed! If you’re bringing it out of the fridge, I like to let it sit at room temperature for 10-15 minutes to soften slightly, which makes the textures even better.
FAQs
-
Can I use fresh cherries instead of canned pie filling?
Absolutely! You can make your own cherry topping by cooking fresh or frozen cherries with a bit of sugar and cornstarch to thicken it up. This gives you a fresher flavor, though canned pie filling is a convenient shortcut that still tastes delicious.
-
What if I don’t have angel food cake?
You can substitute with pound cake, sponge cake, or even ladyfingers. Each will give a slightly different texture, but all will soak up the creamy layers nicely. Just try to keep the pieces bite-sized for easy layering.
-
Can I make the Cherries in the Snow Recipe gluten-free?
Yes, just make sure to use a gluten-free angel food cake or other gluten-free sponge cake alternatives. The rest of the ingredients are naturally gluten-free, but always double-check labels if you have strict dietary restrictions.
-
How far in advance can I prepare this dessert?
You can assemble it up to a day ahead and keep it refrigerated. This actually helps the flavors meld and the cake absorb the cream flavors, making it taste even better the next day.
Final Thoughts
Whenever I make the Cherries in the Snow Recipe, it feels like I’m sharing a little slice of nostalgia — simple yet special. It’s my go-to when I want a fuss-free dessert that’s sure to please a crowd without spending hours in the kitchen. I hope you’ll give it a try soon and find as much joy in it as I do. Trust me, once you taste those layers of creamy, cherry goodness, you’ll understand why it’s a timeless favorite in so many homes!
Print
Cherries in the Snow Recipe
- Prep Time: 15 minutes
- Cook Time: 0 minutes
- Total Time: 2 hours 15 minutes (including chilling time)
- Yield: 8–10 servings 1x
- Category: Dessert
- Method: No-Cook
- Cuisine: American
- Diet: Vegetarian
Description
Cherries in the Snow is a light, fluffy no-bake dessert featuring layers of cream cheese frosting, angel food cake, and sweet cherry pie filling. This easy-to-make treat combines a creamy, tangy base with juicy cherries and airy cake for a refreshing and crowd-pleasing dessert perfect for summer gatherings or potlucks.
Ingredients
Cream Cheese Frosting
- 12 ounces block style cream cheese, room temperature
- ¾ cup powdered sugar, sifted
- ⅓ cup whole milk
- ½ teaspoon vanilla extract
- 8 ounces frozen whipped topping, thawed (Cool Whip brand used)
Dessert Components
- 1 pre-baked angel food cake, torn into ¾-1 inch pieces (15 ounce, 9-inch store bought cake used)
- 42 ounces (2 – 21 ounce cans) cherry pie filling (Comstock brand used)
Instructions
- Prepare Cream Cheese Frosting: In a large mixing bowl, beat the room temperature cream cheese until smooth using an electric mixer. Gradually add the sifted powdered sugar, whole milk, and vanilla extract. Continue to beat until the mixture is creamy and well combined. Gently fold in the thawed whipped topping until fully incorporated and fluffy.
- Assemble Dessert Layers: In a large trifle bowl or deep serving dish, start by layering half of the torn angel food cake pieces evenly on the bottom. Spread half of the cream cheese frosting mixture over the cake pieces, smoothing it out gently with a spatula.
- Add Cherry Pie Filling: Spoon half of the cherry pie filling evenly over the cream cheese layer, making sure to distribute cherries and juice evenly.
- Repeat Layers: Repeat the layers by adding the remaining angel food cake pieces, followed by the remaining cream cheese frosting, and finally the remaining cherry pie filling on top.
- Chill to Set: Cover the assembled dessert loosely with plastic wrap and refrigerate for at least 2 hours, or until well chilled and set. This will allow the flavors to meld and the dessert to firm up for easier serving.
- Serve: Once chilled, serve this refreshing Cherry in the Snow dessert cold, scooping generous portions to enjoy the sweet, creamy, and fruity flavors in each bite.
Notes
- Use room temperature cream cheese for easier mixing and smoother frosting.
- Chilling the dessert for several hours or overnight improves the flavor fusion and texture.
- You can substitute cherry pie filling with fresh cherries cooked with sugar and a little cornstarch if preferred.
- Angel food cake can be replaced with pound cake for a richer texture.
- This dessert is best served cold and consumed within 2-3 days of preparation.


