
Black Forest Cheesecake with Cherry Topping Recipe
I’m so excited to share this Black Forest Cheesecake with Cherry Topping Recipe with you because it combines the best flavors of a classic Black Forest cake in cheesecake form—and trust me, it’s a showstopper! The rich, creamy cheesecake layers perfectly with the chocolate and that irresistible cherry topping. It’s a dessert that feels both elegant and comfortingly familiar, making it perfect for celebrations or just spoiling yourself on a weekend.
One of my favorite things about this Black Forest Cheesecake with Cherry Topping Recipe is how approachable it is—no complex techniques, just simple ingredients that come together beautifully. Whether you’re serving it to guests or treating your family, the extra cherry topping and chocolate shavings seal the deal. Plus, you can make it ahead of time, which is a lifesaver for busy days.
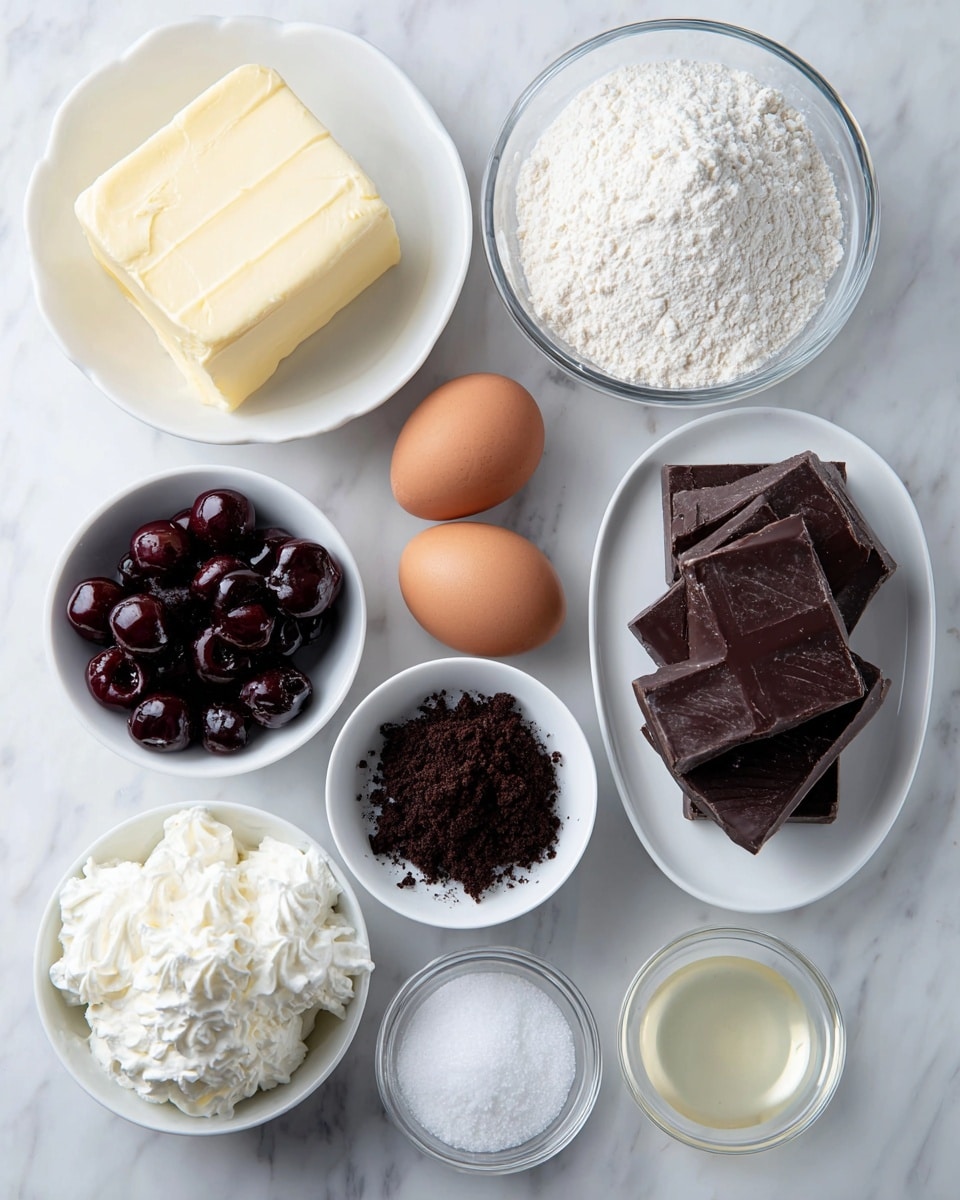
Ingredients You’ll Need
Everything in this recipe works in harmony for that classic Black Forest experience—rich cream cheese, velvety chocolate, bright cherries, and a crunchy Oreo crust that’s a little unexpected but so good. When you shop, look for quality chocolate chips and ripe cherries or great cherry pie filling to get those fresh flavors.
- Oreo cookies: Crushing these gives a chocolatey, slightly crunchy base that holds everything together without needing extra sugar.
- Unsalted butter: Melted to bind the crust; using unsalted helps control the final flavor.
- Cream cheese: Bring it to room temperature for the smoothest cheesecake texture—no lumps!
- Granulated sugar: Sweetens the cheesecake just right without overpowering.
- Eggs: Also at room temp, these give structure and richness.
- Pure vanilla extract: Enhances all your flavors with a warm, subtle fragrance.
- Heavy cream: Adds creaminess and helps the cheesecake stay tender.
- Semisweet chocolate chips: Melted into the batter for that luscious chocolate depth.
- All-purpose flour: Helps set the cheesecake without making it cakey.
- Homemade cherry pie filling: If you can, make your own for fresh flavor, but store-bought works fine too.
- Whipped cream: For topping—it’s light and balances the richness.
- Chocolate shavings: Adds texture and a beautiful finish on top.
Variations
I love making this Black Forest Cheesecake with Cherry Topping Recipe my own by playing with toppings and crust. Don’t be afraid to tweak it to fit your tastes or dietary needs—there’s lots of room to experiment here!
- Gluten-free crust: Swap Oreo cookies for gluten-free chocolate cookies. I did this for a friend once, and it was just as delicious.
- Fruit variations: Try raspberries or blackberries instead of cherries for a fresh twist.
- Dairy-free option: Use vegan cream cheese and coconut cream—results are creamy but slightly different in flavor.
- Extra chocolate: Swirl melted chocolate into the filling before baking for a marbled effect that’s stunning.
- Less sweet: Cut down the sugar slightly if you prefer a less sweet dessert; the cherry topping provides natural sweetness.
How to Make Black Forest Cheesecake with Cherry Topping Recipe
Step 1: Prepare that irresistible Oreo crust
Start by pulsing your Oreo cookies in a food processor until you get fine crumbs. It’s fun to see those cookies transform! Then mix in melted unsalted butter until the crumbs hold together when pressed. Press this firmly into the bottom of a springform pan—you want a nice solid base so it supports the creamy layers. I like to use the bottom of a glass to pack it down evenly. Pop it in the fridge to chill while you make the filling.
Step 2: Whip up the creamy cheesecake filling
Beat your softened cream cheese and sugar until you can feel the smooth, almost silky texture—it helps avoid lumps. Add eggs one at a time, mixing after each, then vanilla and heavy cream to keep things rich. Melt the semisweet chocolate chips gently—either in a microwave or over a double boiler—and stir into the batter with the flour to help it set. Don’t overmix here; just combine everything until smooth.
Step 3: Bake with care
Pour the cheesecake mixture over your chilled crust, smoothing the top gently. Bake in a preheated oven at 325°F (163°C) for about 55-60 minutes. You’re looking for the edges to be set but the center to still have a slight jiggle—that’s the perfect creamy texture. After baking, turn off the oven and crack the door open; let the cheesecake cool inside for an hour to prevent cracking.
Step 4: Chill and add your cherry topping
Once cooled, cover the cheesecake and refrigerate for at least 4 hours, but overnight is best. When you’re ready to serve, spoon homemade or store-bought cherry pie filling generously over the top. Don’t skip the whipped cream and chocolate shavings—these finishing touches make your Black Forest Cheesecake with Cherry Topping Recipe look and taste like a bakery treat.
How to Serve Black Forest Cheesecake with Cherry Topping Recipe
Garnishes
I love finishing this cheesecake with a fluffy cloud of freshly whipped cream and a scatter of dark chocolate shavings. For extra flair, a sprinkle of toasted almonds adds crunch and a nutty contrast that is just dreamy. The colors alone will wow your guests before the first bite!
Side Dishes
Though this cheesecake is a treat all on its own, I sometimes serve it alongside a light salad of mixed greens and a crisp Riesling wine when hosting. It balances a rich dessert well. For a more casual vibe, a scoop of vanilla bean ice cream is a fantastic companion.
Creative Ways to Present
For birthdays or holidays, I’ve tried layering mini versions in cute mason jars for guests to take home. Another idea? Arrange fresh cherries and chocolate curls around individual slices on plates—super simple but feels special. Using colored plates or cake stands also gives the presentation an extra pop.
Make Ahead and Storage
Storing Leftovers
After slicing, I store any leftovers tightly wrapped in plastic wrap or an airtight container in the fridge. The cheesecake holds its flavor and texture well for up to 4 days, which is good news if you’re tempted to keep sneaking bites.
Freezing
I’ve frozen this cheesecake successfully by wrapping whole cakes in plastic wrap and foil before placing them in the freezer. When thawed overnight in the fridge, it retains its creamy texture surprisingly well—just add fresh cherry topping when you’re ready to serve.
Reheating
Cheesecake is best eaten chilled, so I don’t recommend reheating it. If you prefer it less cold, just let slices sit at room temperature for 15-20 minutes. That way, flavors open up without losing the creamy texture.
FAQs
-
Can I use chocolate wafers instead of Oreo cookies for the crust?
Absolutely! Chocolate wafers or any chocolate cookie crumble work well for the crust. Just make sure to crush them finely and mix with enough butter to hold together firmly.
-
Is it necessary to bake the cheesecake in a water bath?
This recipe doesn’t require a water bath, which makes it easier. Just be sure to cool the cheesecake gradually in the oven with the door slightly open to minimize cracking and keep it creamy.
-
How do I make homemade cherry pie filling?
For homemade cherry pie filling, simmer fresh or frozen pitted cherries with sugar, lemon juice, cornstarch, and a splash of water until thickened. Let it cool completely before topping your cheesecake.
-
Can I prepare this cheesecake a day ahead?
Yes! In fact, chilling the cheesecake overnight really helps it set perfectly. Add the cherry topping and garnish just before serving for the freshest look and taste.
-
What’s the best way to avoid cracks on my cheesecake?
To prevent cracks, avoid overmixing the batter, bake at a moderate temperature, and cool the cheesecake gradually by leaving the oven door cracked after baking. Also, don’t open the oven door during baking to keep the temperature stable.
Final Thoughts
This Black Forest Cheesecake with Cherry Topping Recipe holds a special place in my heart because it marries childhood memories of Black Forest cake with the creamy indulgence of cheesecake. I hope you enjoy making it just as much as I do—remember, the key is to take your time and savor each step. Trust me, your friends and family will be begging for seconds!
Print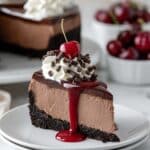
Black Forest Cheesecake with Cherry Topping Recipe
- Prep Time: 25 minutes
- Cook Time: 60 minutes
- Total Time: 5 hours 25 minutes
- Yield: 12 servings 1x
- Category: Dessert
- Method: Baking
- Cuisine: American
Description
Indulge in a rich and decadent Black Forest Cheesecake featuring a crunchy Oreo cookie crust, smooth chocolate-infused cream cheese filling, and a luscious homemade cherry topping finished with whipped cream and chocolate shavings. This dessert combines classic cheesecake with the beloved flavors of Black Forest cake for an irresistible treat perfect for special occasions or any chocolate and cherry lover’s desires.
Ingredients
For the Crust
- 20 Oreo cookies, crushed into fine crumbs
- 3 tablespoons unsalted butter, melted
For the Cheesecake
- 32 ounces cream cheese, room temperature
- ½ cup granulated sugar
- 4 large eggs, room temperature
- 2 teaspoons pure vanilla extract
- ½ cup heavy cream
- 2 cups semisweet chocolate chips
- 2 tablespoons all-purpose flour
For the Topping
- Homemade cherry pie filling (approximately 1 to 1½ cups)
- Whipped cream, for garnish
- Chocolate shavings, for garnish
Instructions
- Prepare the crust: Preheat your oven to 325°F (160°C). Combine the crushed Oreo cookie crumbs with melted butter in a mixing bowl, stirring until the mixture is evenly moistened. Press this mixture firmly into the bottom of a 9-inch springform pan to form an even crust layer. Bake for about 10 minutes, then remove from oven and allow to cool while preparing the filling.
- Melt the chocolate: In a microwave-safe bowl or using a double boiler, gently melt the semisweet chocolate chips until smooth. Set aside to cool slightly.
- Make the cheesecake filling: In a large mixing bowl, beat the room temperature cream cheese with granulated sugar until smooth and creamy. Add eggs one at a time, beating well after each addition to ensure a smooth texture. Mix in vanilla extract and then stir in the cooled melted chocolate. Finally, mix in the flour and heavy cream until fully incorporated and silky.
- Assemble and bake: Pour the cheesecake filling over the cooled Oreo crust in the springform pan. Smooth the top with a spatula. Place the pan on a baking sheet and bake in the preheated oven for approximately 50-60 minutes, or until the edges are set but the center still slightly jiggles when gently shaken. Turn off the oven, crack the oven door, and let the cheesecake cool inside for 1 hour to prevent cracking.
- Chill the cheesecake: Remove the cheesecake from the oven and allow it to cool completely at room temperature. Then cover and refrigerate for at least 4 hours or overnight to set fully.
- Add topping and garnish: Before serving, spread a generous layer of homemade cherry pie filling over the top of the chilled cheesecake. Garnish with dollops of whipped cream and sprinkle with chocolate shavings for an elegant finishing touch.
- Serve: Carefully run a knife along the edges of the pan before releasing the springform latch. Slice the cheesecake with a sharp knife dipped in hot water to create clean cuts. Serve chilled and enjoy the rich combination of creamy chocolate cheesecake and bright cherry topping.
Notes
- Ensure all dairy ingredients are at room temperature to avoid a lumpy batter.
- To avoid cracks, do not overbake the cheesecake; baking it until the center jiggles slightly is ideal.
- Use a water bath or baking the cheesecake on a lower oven rack with a pan of water below the springform pan can help prevent cracking.
- The cherry pie filling can be homemade or store-bought; homemade will provide a fresher taste.
- For a deeper chocolate flavor, use a good quality semisweet chocolate.
- Allow the cheesecake to chill sufficiently for best texture and flavor.
- Leftovers should be stored covered in the refrigerator and consumed within 3-4 days.


